




EZ Preorder guide
How to accept preorders on Shopify with EZ Preorder
Turn on the EZ Preorder app embed in your theme, add products to the app’s preorder list and choose a preorder rule for each variant: Always, Sold out or Specific inventory level. Whenever the rule applies, that variant’s Add to cart button becomes a Pre-order button and orders go through your normal Shopify checkout. The Free plan covers one preorder product; Core and above cover as many as you like.
Before you start
- EZ Preorder installed from the Shopify App Store. The Free plan includes one preorder product, and Core and above remove that cap.
- A compatible theme. Most themes work with the default settings. If yours is heavily customized, check the theme compatibility list first.
- Optional, on the Growth plan and up: preorder start and end dates, collection page badges and preorders for specific markets.
Step by step
-
Step 1: Turn on the app embed
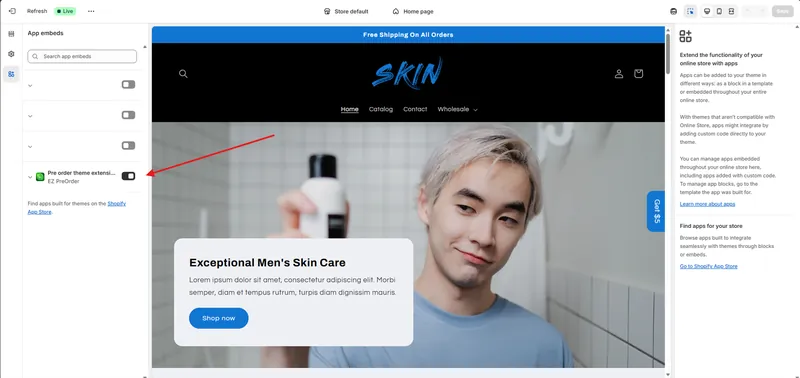
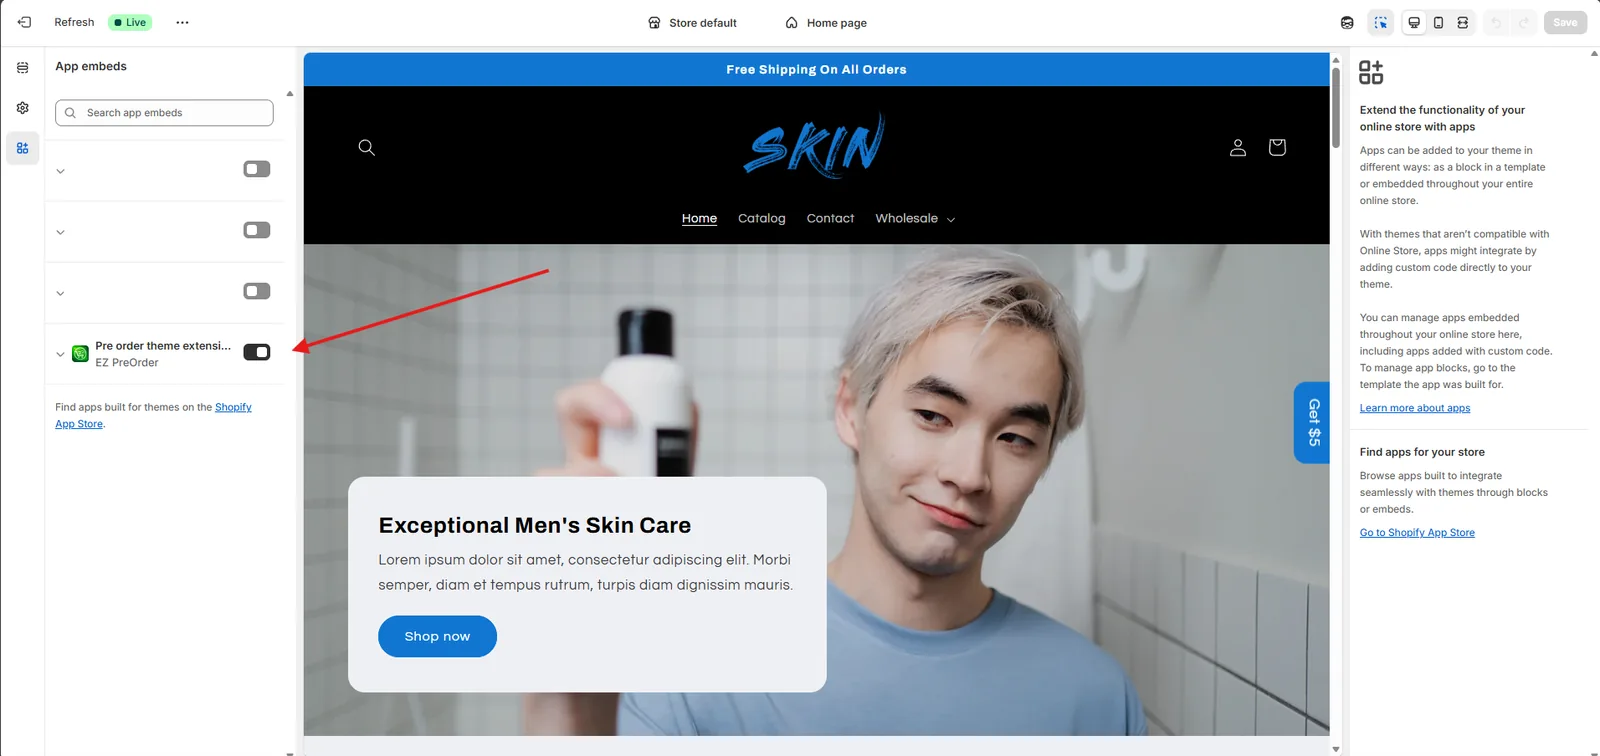
EZ Preorder runs through a theme app embed, and nothing shows on your store until it is on. Use the enable button on the app’s home page, or open Online Store > Themes > Customize > App embeds, switch on the EZ Preorder embed and click Save.
 (open full size)
The EZ Preorder embed switched on under App embeds in the theme editor. -
Step 2: Add products to the preorder list
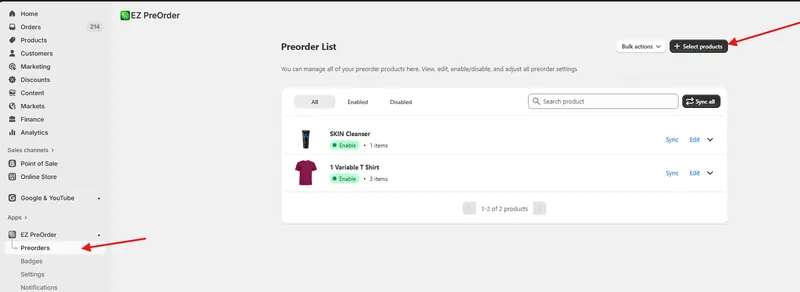
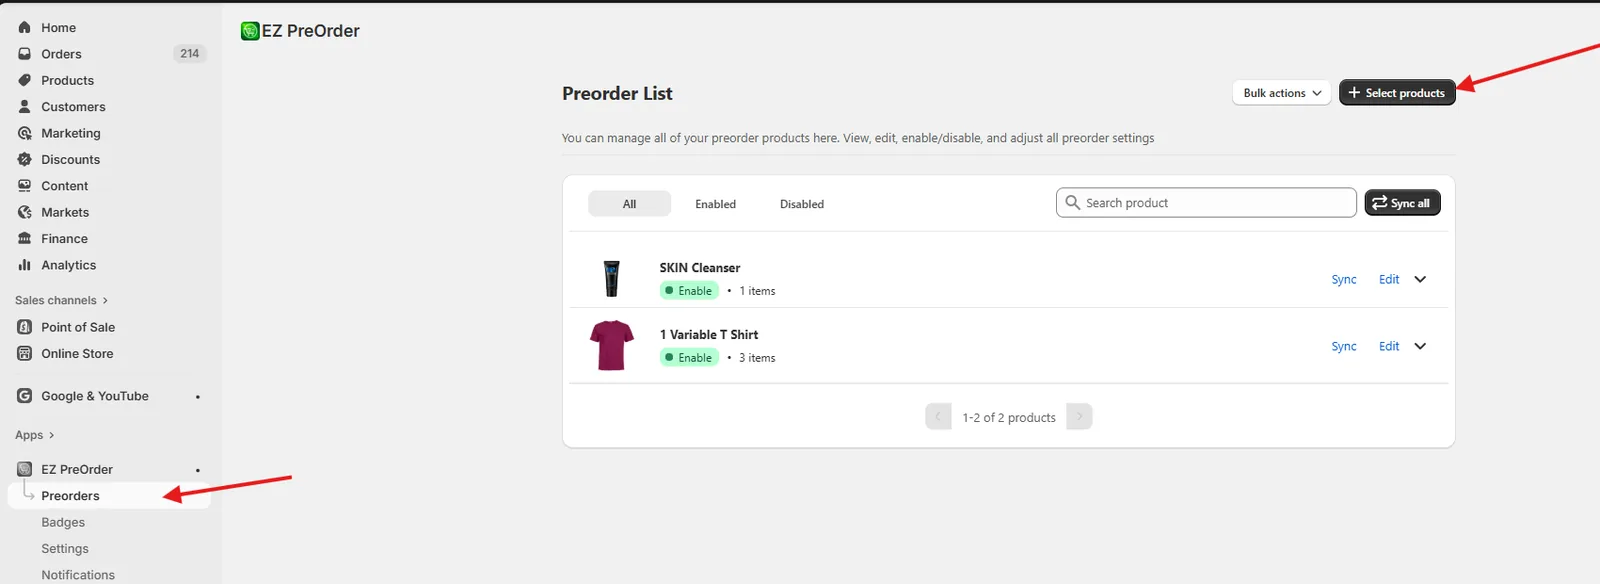
In the app, open Preorders and click Select products in the top right. Choose the products you want to sell in advance. To add a lot of products at once, use Bulk actions.
 (open full size)
The Preorder List, where every preorder product is added, edited and switched on or off. -
Step 3: Choose when each variant is on preorder
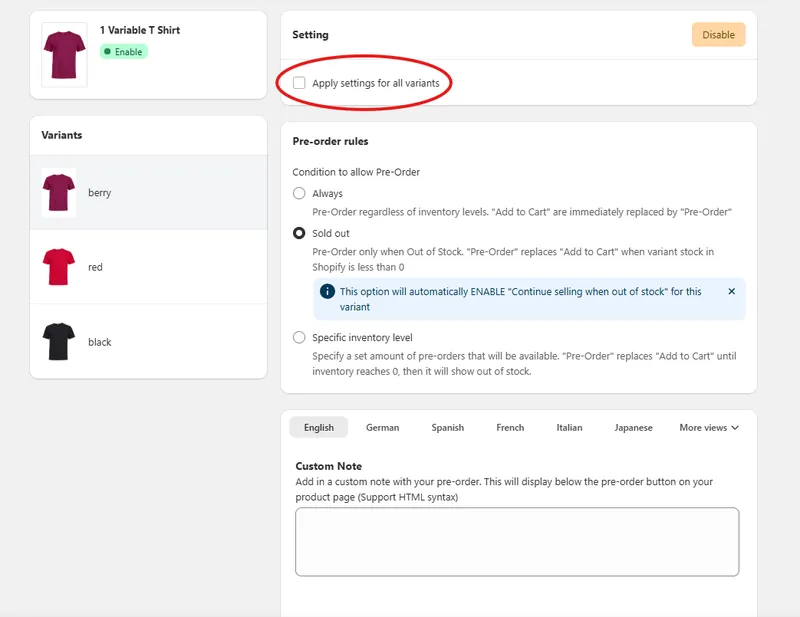
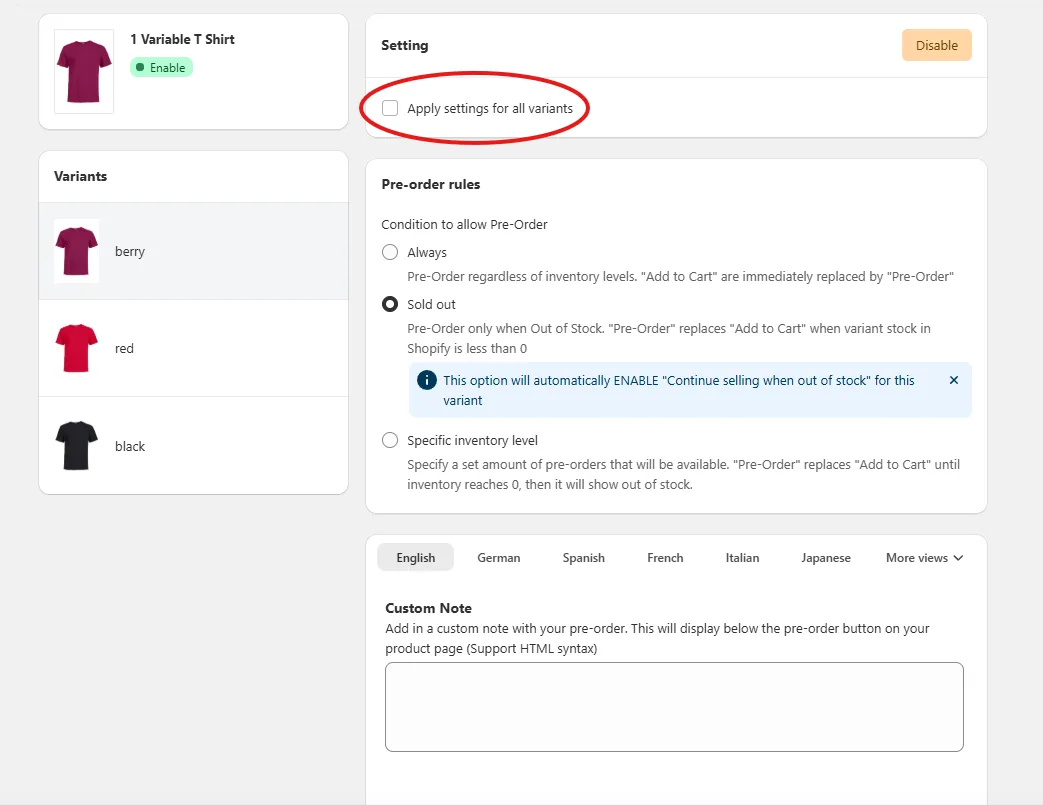
Click Edit on a product. Under Pre-order rules, pick one of three conditions:
- Always: the variant is a preorder whatever your stock level. Use it for products that have not been released.
- Sold out: your normal buttons show while you have stock, and Pre-order takes over once the variant sells out. Use it to keep selling through a stockout.
- Specific inventory level: set the variant’s inventory to the number of preorders you will accept. Pre-order replaces Add to cart until that number reaches 0, then the variant shows as sold out. New products start on this rule.
Always and Sold out switch on Shopify’s Continue selling when out of stock setting for that variant; Specific inventory level leaves it off. Rules are set per variant, so you can put one size or color on preorder and sell the rest normally. Tick Apply settings for all variants to use one rule for the whole product.
 (open full size)
Rules are set per variant. Sold out is selected here, which turns on Continue selling when out of stock for that variant. -
Step 4: Add a ship date note
On the same screen, write a Custom Note such as “Preorders ship by December 15”. It shows with the Pre-order button on the product page, accepts HTML, and can be written separately for each language your store uses. Click Save.
On the Growth plan and up you can also give a preorder a start and end date, so it opens and closes on schedule.
-
Step 5: Turn on preorder confirmation emails
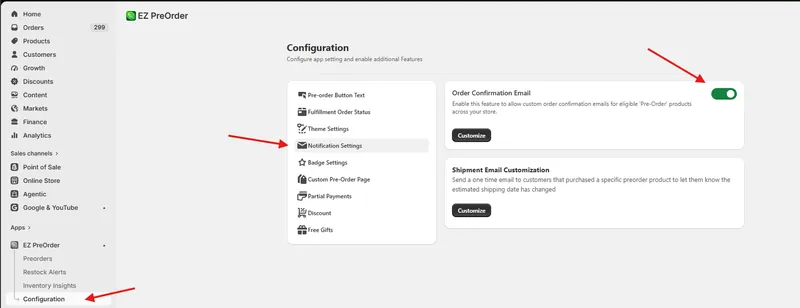
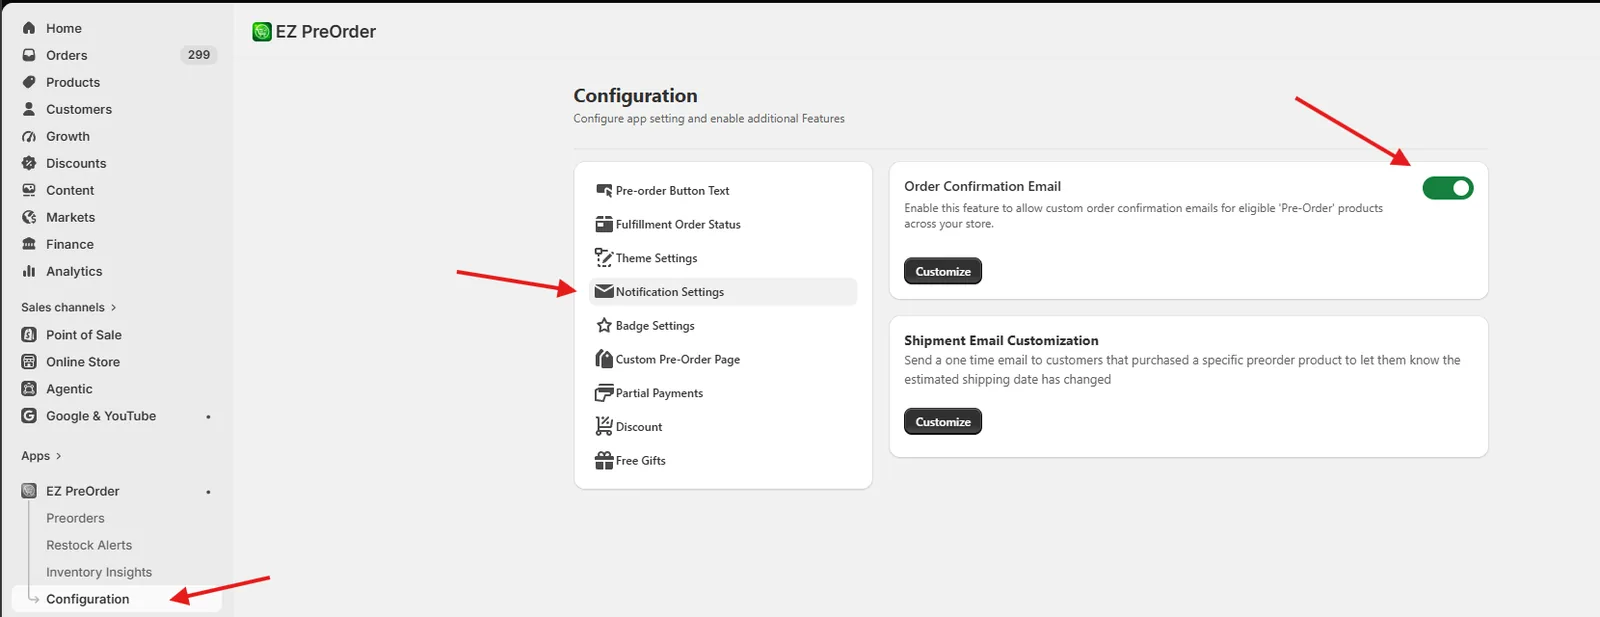
Shopify’s standard order confirmation does not say that an order contains preorder items. To send buyers a preorder confirmation, go to Configuration > Notification Settings, switch on Order Confirmation Email, and click Customize to edit the template.
 (open full size)
Preorder confirmation emails are one switch under Configuration > Notification Settings. -
Step 6: Check the product page
Open the product on your store and confirm the Pre-order button shows where your rule says it should. A variant on the Sold out rule that still has stock shows Add to cart, which is correct. If the button is missing when it should show, open Configuration > Theme Settings in the app and pick your theme under Select theme.
-
Step 7: Manage orders as they come in
Preorders arrive in Shopify as regular orders, so you fulfill them like any other order. The app’s Preorders page lists every product on preorder, and you can edit, disable or remove one at any time. If a ship date moves, send everyone who preordered that product a one-time update from Configuration > Notification Settings > Shipment Email Customization.
What shoppers see
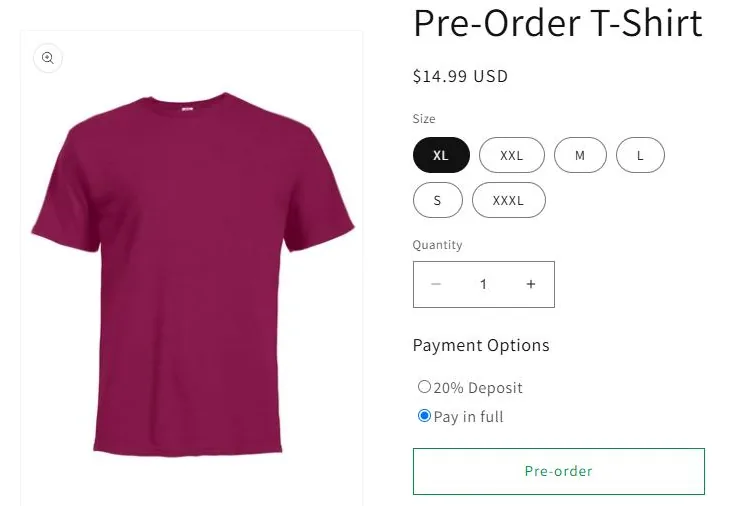
Any variant whose rule applies shows a Pre-order button where Add to cart used to be, with your custom note beside it. Variants without a preorder rule keep your theme’s normal buttons, and the button follows along as shoppers switch size or color.
Watch the walkthrough
A seven minute screen recording of the whole preorder setup on a test store: turning on the app embed, adding a product, trying each preorder rule live on the storefront, adding a ship date note and setting rules per variant.
What the video covers
- 0:00Why stores take preorders: selling through a stockout, and presales before a launch
- 1:20Turning on the EZ Preorder theme extension from the app dashboard
- 1:51Adding a product to preorder
- 2:24The three preorder rules, each checked on the live product page
- 4:16Adding a custom note with the ship date
- 4:48Placing a test preorder and finding the order in Shopify admin
- 6:05Setting rules per variant, with an in-stock size and a sold out size side by side
Recorded at launch in July 2023. The flow is the same today, but a few screens have been renamed since (Settings is now Configuration, for example), so follow the written steps where they differ.
Troubleshooting
- The Pre-order button does not appear
- Check the rule first: a variant on Sold out shows Add to cart until it runs out. Then confirm the app embed is on, and pick your theme under Configuration > Theme Settings > Select theme. If it still does not show, another app or custom code may be changing the product form (other preorder apps are the usual cause), or your theme may be on the known incompatible list. Support can tell you which. Buttons also stop showing once your plan’s preorder allowance is used up, until you upgrade or the allowance resets; see how limits work.
- The button does not change when a shopper switches variant
- Your theme needs the variant switch snippet. In Configuration > Theme Settings, click Add snippet below the Custom JS field and save. If that does not fix it, email support for a snippet made for your theme. See the variant switching fix.
- Adding to cart fails with "This variant can only be purchased with a selling plan"
- In your Shopify admin, open the product, find Purchase options and untick Only sell this product with these purchase options. The same fix applies to a "selling plan does not exist" error. If the error continues, email support.
- A product on the preorder list does not match the product in Shopify
- Changes made in Shopify admin after you add a product can leave the list out of date. Click Sync on that product, or Sync all, on the Preorders page.

Ready to set this up?
Install EZ Preorder from the Shopify App Store. There is a free plan, and you can follow this guide as soon as it is installed.